| DocBook: The Definitive Guide 2.0.17 (Alpha) |
| | DocBook: The Definitive Guide 2.0.17 (Alpha) |
Creating and editing SGML/XML documents is usually only half the battle. After you've composed your document, you'll want to publish it. Publishing, for our purposes, means either print or web publishing. For SGML and XML documents, this is usually accomplished with some kind of stylesheet. In some environments, it is now possible to publish an XML document on the Web simply by putting it online with a stylesheet.
There are many ways, using both free and commercial tools, to publish
SGML documents. In this chapter, we're going to survey a number of
possibilities, and then look at just one solution in detail: Jade and the Modular DocBook
Stylesheets. We used jade to produce this
book and to produce the online versions on the
CD-ROM; it is also being deployed in other projects
such as <SGML>&tools;,
which originated with the Linux Documentation Project.
For a brief survey of other tools, see Appendix D, Resources.
When published on the web, documents must be identified with a MIME type.
The MIME type for SGML DocBook documents published directly on the web
is “application/sgml”.
The most appropriate MIME type for XML DocBook documents published directly on
the web is currently
“application/xml”, however the DocBook Technical Committee
may choose to register a more specific MIME type in the future.
Over the years, a number of attempts have been made to produce a standard stylesheet language and, failing that, a large number of proprietary languages have been developed.
First, the U.S. Department of Defense, in an attempt to standardize stylesheets across military branches, created the Output Specification, which is defined in MIL-PRF-28001C, Markup Requirements and Generic Style Specification for Electronic Printed Output and Exchange of Text.[14]
Commonly called FOSIs (for Formatting Output Specification Instances), they are supported by a few products including ADEPT Publisher by Arbortext and DL Composer by Datalogics.
Next, the International Organization for Standardization (ISO) created DSSSL, the Document Style Semantics and Specification Language. Subsets of DSSSL are supported by Jade and a few other tools, but it never achieved widespread support.
The W3C CSS Working Group created CSS as a style attachment language for HTML, and, more recently, XML.
Most recently, the XML effort has identified a standard Extensible Style Language (XSL) as a requirement. The W3C XSL Working Group is currently pursuing that effort.
By way of comparison, here's an example of each of the standard style languages. In each case, the stylesheet fragment shown contains the rules that reasonably formatted the following paragraph:
<para>
This is an example paragraph. It should be presented in a
reasonable body font. <emphasis>Emphasized</emphasis> words
should be printed in italics. A single level of
<emphasis>Nested <emphasis>emphasis</emphasis> should also
be supported.</emphasis>
</para>
FOSIs are SGML documents. The element in the
FOSI that controls the presentation of specific
elements is the e-i-c (element in context) element.
A sample FOSI fragment is shown in Example 4.1, “A Fragment of a FOSI Stylesheet”.
Example 4.1. A Fragment of a FOSI Stylesheet
<e-i-c gi="para">
  <charlist>
    <textbrk startln="1" endln="1">
  </charlist>
</e-i-c>

<e-i-c gi="emphasis">
  <charlist inherit="1">
    <font posture="italic">
  </charlist>
</e-i-c>

<e-i-c gi="emphasis" context="emphasis">
  <charlist inherit="1">
    <font posture="upright">
  </charlist>
</e-i-c>
DSSSL stylesheets are written in a Scheme-like
language (see the section called “Scheme” later in this chapter). It is the
element function that controls the presentation of
individual elements. See the example in Example 4.2, “A Fragment of a DSSSL Stylesheet”.
Example 4.2. A Fragment of a DSSSL Stylesheet
(element para
  (make paragraph
    (process-children)))

(element emphasis
  (make sequence
    font-posture: 'italic
    (process-children)))

(element (emphasis emphasis)
  (make sequence
    font-posture: 'upright
    (process-children)))
CSS stylesheets consist of selectors and formatting properties, as shown in Example 4.3, “A Fragment of a CSS Stylesheet”.
Example 4.3. A Fragment of a CSS Stylesheet
para              { display: block }
emphasis          { display: inline;
                    font-style: italic; }
emphasis emphasis { display: inline;
                    font-style: upright; }
XSL stylesheets are XML documents, as shown in
Example 4.4, “A Fragment of an XSL Stylesheet”. The element in the XSL
stylesheet that controls the presentation of specific elements is the
xsl:template element.
Example 4.4. A Fragment of an XSL Stylesheet
<?xml version='1.0'?>
<xsl:stylesheet xmlns:xsl="http://www.w3.org/XSL/Transform/1.0"
                xmlns:fo="http://www.w3.org/XSL/Format/1.0">

<xsl:template match="para">
  <fo:block>
    <xsl:apply-templates/>
  </fo:block>
</xsl:template>

<xsl:template match="emphasis">
  <fo:sequence font-style="italic">
    <xsl:apply-templates/>
  </fo:sequence>
</xsl:template>

<xsl:template match="emphasis/emphasis">
  <fo:sequence font-style="upright">
    <xsl:apply-templates/>
  </fo:sequence>
</xsl:template>

</xsl:stylesheet>
Jade is a free tool that applies DSSSL stylesheets to SGML and XML documents. As distributed, Jade can output RTF, TeX, MIF, and SGML. The SGML backend can be used for SGML to SGML transformations (for example, DocBook to HTML).
A complete set of DSSSL stylesheets for creating print and HTML output from DocBook is included on the CD-ROM. More information about obtaining and installing Jade appears in Appendix A, Installation.
DSSSL is a stylesheet language for both print and online rendering. The acronym stands for Document Style Semantics and Specification Language. It is defined by ISO/IEC 10179:1996. For more general information about DSSSL, see the DSSSL Page.
The DSSSL expression language is Scheme, a variant of Lisp. Lisp is a functional programming language with a remarkably regular syntax. Every expression looks like this:
(This is called “prefix” syntax because the operator comes before its arguments.operator[arg1] [arg2] ... [argn] )
In Scheme, the expression that
subtracts 2 from 3, is (- 3 2). And (+ (-
3 2) (* 2 4)) is 9. While the prefix syntax and the
parentheses may take a bit of getting used to, Scheme is not hard to
learn, in part because there are no exceptions to the syntax.
A complete DSSSL stylesheet is shown in Example 4.5, “A Complete DSSSL Stylesheet”. After only a brief examination of the stylesheet, you'll probably begin to have a feel for how it works. For each element in the document, there is an element rule that describes how you should format that element. The goal of the rest of this chapter is to make it possible for you to read, understand, and even write stylesheets at this level of complexity.
Example 4.5. A Complete DSSSL Stylesheet
<!DOCTYPE style-sheet PUBLIC "-//James Clark//DTD DSSSL Style Sheet//EN">

<style-sheet>
<style-specification>
<style-specification-body>

(element chapter
  (make simple-page-sequence
    top-margin: 1in
    bottom-margin: 1in
    left-margin: 1in
    right-margin: 1in
    font-size: 12pt
    line-spacing: 14pt
    min-leading: 0pt
    (process-children)))

(element title
  (make paragraph
    font-weight: 'bold
    font-size: 18pt
    (process-children)))

(element para
  (make paragraph
    space-before: 8pt
    (process-children)))

(element emphasis
  (if (equal? (attribute-string "role") "strong")
      (make sequence
	font-weight: 'bold
	(process-children))
      (make sequence
	font-posture: 'italic
	(process-children))))

(element (emphasis emphasis)
  (make sequence
    font-posture: 'upright
    (process-children)))

(define (super-sub-script plus-or-minus
               #!optional (sosofo (process-children)))
  (make sequence
    font-size: (* (inherited-font-size) 0.8)
    position-point-shift: (plus-or-minus (* (inherited-font-size) 0.4))
    sosofo))

(element superscript (super-sub-script +))
(element subscript (super-sub-script -))

</style-specification-body>
</style-specification>
</style-sheet>
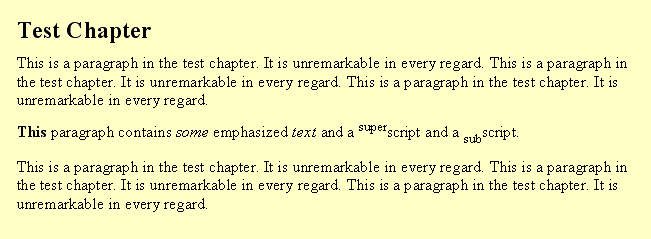
This stylesheet is capable of formatting simple DocBook documents like the one shown in Example 4.6, “A Simple DocBook Document”.
Example 4.6. A Simple DocBook Document
<!DOCTYPE chapter PUBLIC "-//OASIS//DTD Docbook XML V4.1.2//EN"
                  "http://www.oasis-open.org/docbook/xml/4.1.2/docbookx.dtd">
<chapter><title>Test Chapter</title>
<para>
This is a paragraph in the test chapter. It is unremarkable in
every regard. This is a paragraph in the test chapter. It is
unremarkable in every regard. This is a paragraph in the test
chapter. It is unremarkable in every regard.
</para>
<para>
<emphasis role="bold">This</emphasis> paragraph contains
<emphasis>some <emphasis>emphasized</emphasis> text</emphasis>
and a <superscript>super</superscript>script
and a <subscript>sub</subscript>script.
</para>
<para>
This is a paragraph in the test chapter. It is unremarkable in
every regard. This is a paragraph in the test chapter. It is
unremarkable in every regard. This is a paragraph in the test
chapter. It is unremarkable in every regard.
</para>
</chapter>
The result of formatting a simple document with this stylesheet can be seen in Figure 4.1, “The formatted simple document”.
We'll take a closer look at this stylesheet after you've learned a little more DSSSL.
One of the first things that may strike you about DSSSL stylesheets (aside from all the parentheses), is the fact that the stylesheet itself is an SGML document! This means that you have all the power of SGML documents at your disposal in DSSSL stylesheets. In particular, you can use entities and marked sections to build a modular stylesheet.
In fact, DSSSL stylesheets are defined so that they correspond to a particular architecture. This means that you can change the DTD used by stylesheets within the bounds of the architecture. A complete discussion of document architectures is beyond the scope of this book, but we'll show you one way to take advantage of them in your DSSSL stylesheets in the section called “The DSSSL Architecture” later in the chapter.
A DSSSL processor builds a tree out of the source document. Each element in the source document becomes a node in the tree (processing instructions and other constructs become nodes as well). Processing the source tree begins with the root rule and continues until there are no more nodes to process.
There aren't any global variables or side effects. It can be difficult to come to grips with this, especially if you're just starting out.
It is possible to define constants
and functions and to create local variables with let expressions,
but you can't create any global variables or change anything after
you've defined it.
DSSSL has a rich vocabulary of expressions for dealing with all of the intricacies of formatting. Many, but by no means all of them, are supported by Jade. In this introduction, we'll cover only a few of the most common.
Element expressions, which define the rules for formatting particular
elements, make up the bulk of most DSSSL
stylesheets. A simple element rule can be seen in Example 4.7, “A Simple DSSSL Rule”. This rule says that a para
element should be formatted by making a paragraph (see the section called “Make expressions”).
Example 4.7. A Simple DSSSL Rule
(element para
  (make paragraph
    space-before: 8pt
    (process-children)))
An element expression can be made more specific by specifying an
element and its ancestors instead of just specifying an element. The
rule (element title ...) applies to all
Title elements, but a rule that begins
(element (figure title) ...) applies only to
Title elements that are immediate children of
Figure elements.
If several rules apply, the most specific rule is used.
When a rule is used, the node in the source tree that was matched becomes the “current node” while that element expression is being processed.
A make expression specifies the characteristics of a “flow object.” Flow objects are abstract representations of content (paragraphs, rules, tables, and so on). The expression:
(make paragraph
  font-size: 12pt
  line-spacing: 14pt ...)
specifies that the content that goes “here” is to be placed into a paragraph flow object with a font-size of 12pt and a line-spacing of 14pt (all of the unspecified characteristics of the flow object are defaulted in the appropriate way).
They're called flow objects because DSSSL, in its full generality, allows you to specify the characteristics of a sequence of flow objects and a set of areas on the physical page where you can place content. The content of the flow objects is then “poured on to” (or flows in to) the areas on the page(s).
In most cases, it's sufficient to think of the make expressions as
constructing the flow objects, but they really only specify the
characteristics of the flow objects. This detail
is apparent in one of the most common and initially confusing pieces
of DSSSL jargon: the
sosofo. Sosofo stands for a
“specification of a sequence of flow objects.” All this
means is that processing a document may result in a nested set of
make expressions (in other words, the paragraph may contain a table that
contains rows that contain cells that contain paragraphs, and so on).
The general form of a make expression is:
(makeflow-object-namekeyword1:value1keyword2:value2...keywordn:valuen(content-expression))
Keyword arguments specify the characteristics of the flow object. The
specific characteristics you use depends on the flow object. The
content-expression can vary; it is usually
another make expression or one of the processing expressions.
Some common flow objects in the print stylesheet are:
simple-page-sequence
Contains a sequence of pages. The keyword arguments of this flow
object let you specify margins, headers and footers, and other
page-related characteristics. Print stylesheets should always produce
one or more simple-page-sequence flow objects.
Nesting simple-page-sequence does not
work. Characteristics on the inner sequences are ignored.
paragraphA paragraph is used for any block of text. This may include not only paragraphs in the source document, but also titles, the terms in a definition list, glossary entries, and so on. Paragraphs in DSSSL can be nested.
sequenceA sequence is a wrapper. It is most frequently used to change inherited characteristics (like font style) of a set of flow objects without introducing other semantics (such as line breaks).
scoreA score flow object creates underlining, strike-throughs, or overlining.
tableThe HTML stylesheet uses the SGML backend, which has a different selection of flow objects.
element
Creates an element. The content of this make
expression will appear between the start and end tags. The expression:
(make element gi: "H1"
	    (literal "Title"))
produces <H1>Title</H1>.
empty-elementCreates an empty element that may not have content. The expression:
(make empty-element gi: "BR"
     attributes: '(("CLEAR" "ALL")))
produces <BR CLEAR="ALL">.
sequenceProduces no output in of itself as a wrapper, but is still required in DSSSL contexts in which you want to output several flow objects but only one object top-level object may be returned.
entity-refInserts an entity reference. The expression:
(make entity-ref name: "nbsp")
produces .
In both stylesheets, a completely empty flow object is constructed
with (empty-sosofo).
Extracting parts of the source document can be accomplished with these functions:
(data nd)
Returns all of the character data from nd as a
string.
(attribute-string "attr" nd)
Returns the value of the attr attribute of nd.
(inherited-attribute-string "attr" nd)
Returns the value of the attr attribute of
nd. If that attribute is not specified on
nd, it searches up the hierarchy for the first
ancestor element that does set the attribute, and returns its value.
A common requirement of formatting is the ability to reorder content. In order to do this, you must be able to select other elements in the tree for processing. DSSSL provides a number of functions that select other elements. These functions all return a list of nodes.
(current-node)Returns the current node.
(children nd)Returns the children of nd.
(descendants nd)
Returns the descendants of nd (the children of
nd and all their children's children, and so on).
(parent nd)Returns the parent of nd.
(ancestor "name" nd)
Returns the first ancestor of nd named
name.
(element-with-id "id")
Returns the element in the document with the ID
id, if such an element exists.
(select-elements node-list "name")
Returns all of the elements of the node-list that have
the name name. For example, (select-elements
(descendants (current-node)) "para") returns a list of all
the paragraphs that are descendants of the current node.
(empty-node-list)Returns a node list that contains no nodes.
Other functions allow you to manipulate node lists.
(node-list-empty? nl)
Returns true if (and only if) nl is an empty node
list.
(node-list-length nl)Returns the number of nodes in nl.
(node-list-first nl)
Returns a node list that consists of the single node that is the first
node in nl.
(node-list-rest nl)
Returns a node list that contains all of the nodes in
nl except the first node.
There are many other expressions for manipulating nodes and node lists.
Processing expressions control which elements in the document will be processed and in what order. Processing an element is performed by finding a matching element rule and using that rule.
(process-children)Processes all of the children of the current node. In most cases, if no process expression is given, processing the children is the default behavior.
(process-node-list nl)Processes each of the elements in nl.
You can declare your own functions and constants in DSSSL. The general form of a function declaration is:
(define (A constant declaration is:functionargs)function-body)
(defineconstantconstant-function-body)
The distinction between constants and functions is that the body of a constant is evaluated when the definition occurs, while functions are evaluated when they are used.
In DSSSL, the constant #t
represents true and #f false. There are several
ways to test conditions and take action in DSSSL.
if
The form of an if expression is:
(ifconditiontrue-expressionfalse-expression)
If the condition is true, the
true-expression is evaluated, otherwise the
false-expression is evaluated. You must
always provide an expression to be evaluated when the condition is not
met. If you want to produce nothing, use
(empty-sosofo).
case
case selects from among several alternatives:
(caseexpression((constant1) (expression1) ((constant2) (expression2) ((constant3) (expression3) (elseelse-expression))
The value of the expression is compared against each of the constants in turn and the expression associated with the first matching constant is evaulated.
cond
cond also selects from among several alternatives,
but the selection is performed by evaluating each expression:
(cond ((condition1) (expression1) ((condition2) (expression2) ((condition3) (expression3) (elseelse-expression))
The value of each conditional is calculated in turn. The expression associated with the first condition that is true is evaluated.
Any expression that returns #f is false; all other
expressions are true. This can be somewhat counterintuitive. In many
programming languages, it's common to assume that “empty”
things are false (0 is false, a null pointer is false, an empty set is
false, for example.) In DSSSL, this isn't the case;
note, for example, that an empty node list is not
#f and is therefore true. To avoid these
difficulties, always use functions that return true or false in
conditionals. To test for an empty node list, use
(node-list-empty?).
The way to create local variables in DSSSL is with
(let). The general form of a let
expression is:
(let ((var1expression1) (var2expression2) ... (varnexpressionn))let-body)
In a let; expression, all of the variables are
defined “simultaneously.” The expression that defines
var2 cannot contain any references to any
other variables defined in the same let
expression. A let* expression allows variables to
refer to each other, but runs slightly slower.
Variables are available only within the
let-body. A common use of
let is within a define
expression:
(define (cals-rule-default nd)
   (let* ((table (ancestor "table" nd))
          (frame (if (attribute-string "frame" table)
                     (attribute-string "frame" table)
                     "all")))
    (equal? frame "all")))
This function creates two local variables table and
frame. let returns the value of
the last expression in the body, so this function returns true if the
frame attribute on the table is
all or if no frame attribute is present.
DSSSL doesn't have any construct that resembles the “for loop” that occurs in most imperative languages like C and Java. Instead, DSSSL employs a common trick in functional languages for implementing a loop: tail recursion.
Loops in DSSSL use a special form of
let. This loop counts from 1 to 10:
(letloopvar
((count 1))
(if (> count 10)
#t (
loopvar
(+ count 1))))
Example 4.5, “A Complete DSSSL Stylesheet” is a style sheet that contains a style specification. Stylesheets may consist of multiple specifications, as we'll see in the section called “A Single Stylesheet for Both Print and HTML”.
The actual DSSSL code goes in the style specification body, within the style specification. Each construction rule processes different elements from the source document.
Chapters are processed by the chapter
construction rule. Each Chapter is formatted as a
simple-page-sequence. Every print stylesheet should format
a document as one or more simple page sequences. Characteristics on
the simple page sequence can specify headers and footers as well as
margins and other page parameters.
One important note about simple page sequences: they cannot nest.
This means that you cannot blindly process divisions
(Parts, Reference) and the elements they
contain (Chapters, RefEntrys) as simple page
sequences. This sometimes involves a little creativity.
The make expression in the title element rule
ensures that Titles are formatted in large, bold print.
This construction rule applies equally to Chapter titles,
Figure titles, and Book titles. It's unlikely
that you'd want all of these titles to be presented in the same way,
so a more robust stylesheet would have to arrange the processing of
titles with more context. This might be achieved in the way that
nested Emphasis elements are handled in the section called “Processing emphasis”.
Para elements are simply formatted as paragraphs.
Processing Emphasis elements is made a little more
interesting because we want to consider an attribute value and the
possibility that Emphasis elements can be nested.
In the simple case, in which we're processing an Emphasis
element that is not nested, we begin by testing the value of the
role attribute. If the content of that
attribute is the string strong, it is formatted
in bold; otherwise, it is formatted in italic.
The nested case is handled by the (emphasis emphasis)
rule. This rule simply formats the content using an upright
(nonitalic) font. This rule, like the rule for Titles, is
not robust. Emphasis nested inside
strong Emphasis won't be distinguished,
for example, and nestings more than two elements deep will be handled
just as nestings that are two deep.
Processing Subscript and Superscript elements
is really handled by the super-sub-script function.
There are several interesting things about this function:
plus-or-minus argument
You might ordinarily think of passing a keyword or boolean argument to
the super-sub-script function to indicate whether
subscripts or superscripts are desired. But with Scheme, it's
possible to pass the actual function as an argument!
Note that in the element construction rules for
Superscript and Subscript, we pass the actual
functions + and -. In the body of
super-sub-script, we use the
plus-or-minus argument as a function name (it
appears immediately after an open parenthesis).
optional arguments are indicated by
#!optional in the function declaration. Any number of
optional arguments may be given, but each must
specify a default value. This is accomplished by listing each
argument and default value (an expression) as a pair.
In super-sub-script, the optional argument
sosofo is initialized to process-children.
This means that at the point where the function is
called, process-children is evaluated and the
resulting sosofo is passed to the function.
It is possible to use the “current” value of an inherited characteristic to calculate a new value. Using this technique, superscripts and subscripts will be presented at 80 percent of the current font size.
The best way to customize the stylesheets is to write your own “driver” file; this is a stylesheet that contains your local modifications and then includes the appropriate stylesheet from the standard distribution by reference. This allows you to make local changes and extensions without modifying the distributed files, which makes upgrading to the next release much simpler.
A basic driver file looks like this:
<!DOCTYPE style-sheet PUBLIC "-//James Clark//DTD DSSSL Style Sheet//EN" [
<!ENTITY dbstyle PUBLIC "-//Norman Walsh//DOCUMENT DocBook Print Stylesheet//EN" CDATA DSSSL>
]>

<style-sheet>
<style-specification use="docbook">
<style-specification-body>

;; your changes go here...

</style-specification-body>
</style-specification>
<external-specification id="docbook" document="dbstyle">
</style-sheet>
There are two public identifiers associated with the Modular DocBook Stylesheets:
-//Norman Walsh//DOCUMENT DocBook Print Stylesheet//EN
-//Norman Walsh//DOCUMENT DocBook HTML Stylesheet//EN
You can add your own definitions, or redefinitions, of stylesheet rules and parameters so that
;; your changes go here...occurs in the previous example.
For a concrete example of a driver file, see
plain.dsl in the
docbook/print directory in the stylesheet
distribution (or on the CD-ROM). This is a
customization of the print stylesheet, which turns off title page and
TOC generation.
As distributed, the stylesheets use English for all generated text, but other localization files are also provided. The languages supported at the time of this writing are summarized in Table 4.1, “DocBook Stylesheet Language Codes”. (If you can write a localization for another language, please contribute it.)
There are two ways to switch languages: by specifying a lang attribute, or by changing the
default language in a customization.
One of the DocBook common attributes is
lang. If you specify a language, the DocBook stylesheets
will use that language (and all its descendants, if no other language
is specified) for generated text within that element.
Table 4.1, “DocBook Stylesheet Language Codes” summarizes the language codes for the supported languages.[15] The following chapter uses text generated in French:
<chapter lang="fr"><title>Bêtises</title>
<para>Pierre qui roule n'amasse pas de mousse.</para>
</chapter>
Table 4.1. DocBook Stylesheet Language Codes
| Language Code | Language |
|---|---|
af | Afrikaans |
ca | Catalan |
cs | Czech |
da | Danish |
de | German |
el | Greek |
en | English |
es | Spanish |
et | Estonian |
eu | Basque |
fi | Finnish |
fr | French |
he | Hebrew |
hu | Hungarian |
id | Indonesian |
it | Italian |
ja | Japanese |
ko | Korean |
nl | Dutch |
nn | Nyorsk |
no | Norwegian |
pl | Polish |
pt | Portuguese |
pt-br | Portuguese (Brazil) |
ro | Romanian |
ru | Russian |
sk | Slovak |
sl | Slovenian |
sv | Swedish |
th | Thai |
tr | Turkish |
uk | Ukranian |
xh | Xhosa |
zh-cn | Chinese (Continental) |
zh-tw | Chinese (Traditional) |
If no lang attribute is
specified, the default language is used. You can change the default
language with a driver.
In the driver, define the default language. Table 4.1, “DocBook Stylesheet Language Codes” summarizes the language codes for the supported languages. The following driver makes German the default language:
<!DOCTYPE style-sheet PUBLIC "-//James Clark//DTD DSSSL Style Sheet//EN" [
<!ENTITY dbstyle PUBLIC "-//Norman Walsh//DOCUMENT DocBook Print Stylesheet//EN" CDATA DSSSL>
]>

<style-sheet>
<style-specification use="docbook">
<style-specification-body>

(define %default-language% "dege")

</style-specification-body>
</style-specification>
<external-specification id="docbook" document="dbstyle">
</style-sheet>
There are two other settings that can be changed only in a driver. Both of these settings are turned off in the distributed stylesheet:
%gentext-language%
If a language code is specified in
%gentext-language%, then that language will be used
for all generated text, regardless of any lang attribute settings in the
document.
%gentext-use-xref-language%
If turned on (defined as #t), then the stylesheets
will generate the text associated with a cross reference using the
language of the target, not the current language. Consider the
following book:
<book><title>A Test Book</title>
<preface>
<para>There are three chapters in this book: <xref linkend="c1">,
<xref linkend="c2">, and <xref linkend="c3">.
</para>
</preface>
<chapter lang="usen"><title>English</title> ... </chapter>
<chapter lang="fr"><title>French</title> ... </chapter>
<chapter lang="dege"><title>Deutsch</title> ... </chapter>
</book>
The standard stylesheets render the Preface as something like this:
There are three chapters in this book: Chapter 1, Chapter 2, and Chapter 3.
With %gentext-use-xref-language% turned on, it
would render like this:
There are are three chapters in this book: Chapter 1, Chapitre 2, and Kapitel 3.
A DSSSL stylesheet consists of one or more
“style specifications.” Using more than one style
specification allows you to build a single stylesheet file that can
format with either the print or SGML backends. Example 4.8, “both.dsl: A Stylesheet with Two Style Specifications” shows a stylesheet with two style
specifications.
Example 4.8. both.dsl: A Stylesheet with Two Style Specifications
<!DOCTYPE style-sheet PUBLIC "-//James Clark//DTD DSSSL Style Sheet//EN" [
<!ENTITY html-ss
  PUBLIC "-//Norman Walsh//DOCUMENT DocBook HTML Stylesheet//EN" CDATA dsssl>
<!ENTITY print-ss
  PUBLIC "-//Norman Walsh//DOCUMENT DocBook Print Stylesheet//EN" CDATA dsssl>
]>
<style-sheet>
<style-specification id="print" use="print-stylesheet">
<style-specification-body>

;; customize the print stylesheet

</style-specification-body>
</style-specification>
<style-specification id="html" use="html-stylesheet">
<style-specification-body>

;; customize the html stylesheet

</style-specification-body>
</style-specification>
<external-specification id="print-stylesheet" document="print-ss">
<external-specification id="html-stylesheet"  document="html-ss">
</style-sheet>
Once you have stylesheets with more than one style specification, you
have to be able to indicate which style specification you want to
use. In Jade, you indicate this by providing the ID
of the style specification after the stylesheet filename, separated
with a hash mark: #.
Using the code from Example 4.8, “both.dsl: A Stylesheet with Two Style Specifications”, you can format a
document using the print stylesheet by running:
jade -t rtf -d both.dsl#print file.sgm
and using the HTML stylesheet by running:
jade -t sgml -d both.dsl#html file.sgm
The DocBook SGML DTD and the DocBook DSSSL Stylesheets happen to use the same SGML declaration. This makes it very easy to run Jade with DocBook. However, you may sometimes wish to use Jade with other document types, for example the DocBook XML DTD, which has a different declaration. There are a couple of ways to do this.
If your stylesheets parse fine with the default declaration, but you want to use an alternate declaration with a particular document, just pass the declaration on the command line:
jade options the-declaration the-document
Note that there's no option required before the declaration; it simply
occurs before the first filename. Jade concatenates all of the files
that you give it together, and parses them as if they were one
document.
The other way to fix this is with a little catalog trickery.
First, note that Jade always looks in the file called
catalog in the same directory as the document
that it is loading, and uses settings in that file in preference to
settings in other catalogs.
With this fact, we can employ the following trick:
Put a catalog file in the directory that
contains your stylesheets, which contain an
SGMLDECL directive. Jade understands the
directive, which points to the SGML declaration that you should use
when parsing the stylesheets. For the DocBook stylesheets, the DocBook
declaration works fine.
In the directory that contains the document you want to process,
create a catalog file that contains an
SGMLDECL directive that points to the SGML
declaration that should be used when parsing the document.
There's no easy way to have both the stylesheet and the document in the same directory if they must be processed with different declarations. But this is usually not too inconvenient.
The concept of an architecture was promoted by HyTime. In some ways, it takes the standard SGML/XML notions of the role of elements and attributes and inverts them. Instead of relying on the name of an element to assign its primary semantics, it uses the values of a small set of fixed attributes.
While this may be counterintuitive initially, it has an interesting benefit. An architecture-aware processor can work transparently with many different DTDs. A small example will help illustrate this point.
The following example demonstrates the concept behind architectures, but for the sake of simplicity, it does not properly implement an architecture as defined in HyTime.
Imagine that you wrote an application that can read an SGML/XML document containing a letter (conforming to some letter DTD), and automatically print an envelope for the letter. It's easy to envision how this works. The application reads the content of the letter, extracts the address and return address elements from the source, and uses them to generate an envelope:
<?xml version='1.0'> <!DOCTYPE letter "/share/sgml/letter/letter.dtd" [ <!ENTITY myaddress "/share/sgml/entities/myaddress.xml"> ]> <letter> <returnaddress>&myaddress;</returnaddress> <address> <name>Leonard Muellner</name> <company>O'Reilly & Associates</company> <street>90 Sherman Street</street> <city>Cambridge</city><state>MA</state><zip>02140</zip> </address> <body> <salutation>Hi Lenny</salutation> ... </body>
The processor extracts the Returnaddress and
Address elements and their children
and prints the envelope accordingly.
Now suppose that a colleague from payroll comes by and asks you to adapt the application to print envelopes for mailing checks, using the information in the payroll database, which has a different DTD. And a week later, someone from sales comes by and asks if you can modify the application to use the contact information DTD. After a while, you would have 11 versions of this program to maintain.
Suppose that instead of using the actual element names to locate the addresses in the documents, you asked each person to add a few attributes to their DTD. By forcing the attributes to have fixed values, they'd automatically be present in each document, but authors would never have to worry about them.
For example, the address part of the letter DTD might look like this:
<!ELEMENT address (name, company? street*, city, state, zip)>
<!ATTLIST address
	ADDRESS	CDATA	#FIXED "START"
>

<!ELEMENT name (#PCDATA)*>
<!ATTLIST name
	ADDRESS	CDATA	#FIXED "NAME"
>

<!ELEMENT company (#PCDATA)*>
<!ATTLIST company
	ADDRESS	CDATA	#FIXED "COMPANY"
>

<!ELEMENT street (#PCDATA)*>
<!ATTLIST street
	ADDRESS	CDATA	#FIXED "STREET"
>

<!ELEMENT city (#PCDATA)*>
<!ATTLIST city
	ADDRESS	CDATA	#FIXED "CITY"
>

<!ELEMENT state (#PCDATA)*>
<!ATTLIST state
	ADDRESS	CDATA	#FIXED "STATE"
>

<!ELEMENT zip (#PCDATA)*>
<!ATTLIST zip
	ADDRESS	CDATA	#FIXED "ZIP"
>
Effectively, each address in a letter would look like this:
<address ADDRESS="START"> <name ADDRESS="NAME">Leonard Muellner</name> <company ADDRESS="COMPANY">O'Reilly &amp; Associates</company> <street> ADDRESS="STREET">90 Sherman Street</street> <city ADDRESS="CITY">Cambridge</city><state ADDRESS="STATE">MA</state> <zip ADDRESS="ZIP">02140</zip> </address>
In practice, the author would not include the ADDRESS attributes; they are automatically
provided by the DTD because they are
#FIXED.[16]
Now the address portion of the payroll DTD might look like this:
<!ELEMENT employee (name, mailingaddress)>

<!ELEMENT name (#PCDATA)*>
<!ATTLIST name
	ADDRESS	CDATA	#FIXED "NAME"
>

<!ELEMENT mailingaddress (addrline1, addrline2,
                          city, state.or.province, postcode)>
<!ATTLIST mailingaddress
	ADDRESS	CDATA	#FIXED "START"
>

<!ELEMENT addrline1 (#PCDATA)*>
<!ATTLIST addrline1
	ADDRESS	CDATA	#FIXED "STREET"
>

<!ELEMENT addrline2 (#PCDATA)*>
<!ATTLIST addrline2
	ADDRESS	CDATA	#FIXED "STREET"
>

<!ELEMENT city (#PCDATA)*>
<!ATTLIST city
	ADDRESS	CDATA	#FIXED "CITY"
>

<!ELEMENT state.or.province (#PCDATA)*>
<!ATTLIST state.or.province
	ADDRESS	CDATA	#FIXED "STATE"
>

<!ELEMENT postcode (#PCDATA)*>
<!ATTLIST postcode
	ADDRESS	CDATA	#FIXED "ZIP"
>
The employee records will look like this:
<employee><name ADDRESS="NAME">Leonard Muellner</name>
<mailingaddress ADDRESS="START">
<addrline1 ADDRESS="STREET">90 Sherman Street</addrline1>
<city ADDRESS="CITY">Cambridge</city>
<state.or.province ADDRESS="STATE">MA</state.or.province>
<postcode ADDRESS="ZIP">02140</postcode>
</mailingaddress>
</employee>
Your application no longer cares about the actual element names. It simply looks for the elements with the correct attributes and uses them. This is the power of an architecture: it provides a level of abstraction that processing applications can use to their advantage. In practice, architectural forms are a bit more complex to set up because they have facilities for dealing with attribute name conflicts, among other things.
Why have we told you all this? Because DSSSL is an architecture. This means you can modify the stylesheet DTD and still run your stylesheets through Jade.
Consider the case presented earlier in Example 4.8, “both.dsl: A Stylesheet with Two Style Specifications”.
In order to use this stylesheet, you must specify three things: the
backend you want to use, the stylesheet you want to use, and the
style specification you want to use. If you mismatch any of the
parameters, you'll get the wrong results. In practice, the problem is
compounded further:
Some stylesheets support several backends (RTF, TeX, and SGML).
Some stylesheets support only some backends (RTF and SGML, but not TeX or MIF).
Some stylesheets support multiple outputs using the same backend (several kinds of HTML output, for example, using the SGML backend: HTML, HTMLHelp, JavaHelp, and so on).
If you have complex stylesheets, some backends may require additional options to define parameter entities or stylesheet options.
None of this complexity is really necessary, after all, the options don't change—you just have to use the correct combinations. The mental model is really something like this: “I want a certain kind of output, TeX say, so I have to use this combination of parameters.”
You can summarize this information in a table to help keep track of it:
| Desired Output | Backend | Style specification | Options | Supported? |
|---|---|---|---|---|
| rtf | rtf | -V rtf-backend | yes | |
| tex | tex | -V tex-backend -i tex | yes | |
| html | sgml | htmlweb | -i html | yes |
| javahelp | sgml | help | -i help | yes |
| htmlhelp | no |
Putting this information in a table will help you keep track of it, but it's not the best solution. The ideal solution is to keep this information on your system, and let the software figure it all out. You'd like to be able to run a command, tell it what output you want from what stylesheet, what file you want to process, and then let it figure everything else out. For example:
format html mybook.dsl mydoc.sgm
One way to do this is to put the configuration data in a separate file, and have the format command load it out of this other file. The disadvantage of this solution is that it introduces another file that you have to maintain and it's independent from the stylesheet so it isn't easy to keep it up-to-date.
In the DSSSL case, a better alternative is to
modify the stylesheet DTD so you can store the configuration
data in the stylesheet. Using this alternate DTD, your
mybook.dsl stylesheets might look like this:
<!DOCTYPE style-sheet
  PUBLIC "-//Norman Walsh//DTD Annotated DSSSL Style Sheet V1.2//EN" [
<!-- perhaps additional declarations here -->
]>
<style-sheet>
<title>DocBook Stylesheet</title>
<doctype pubid="-//OASIS//DTD DocBook V3.1//EN">
<doctype pubid="-//Davenport//DTD DocBook V3.0//EN">
<doctype pubid="-//Norman Walsh//DTD Website V1.4//EN">
<backend name="rtf"  backend="rtf"  fragid="print"
         options="-V rtf-backend" default="true">
<backend name="tex"  backend="tex"  fragid="print"
         options="-V tex-backend -i tex">
<backend name="html" backend="sgml" fragid="htmlweb" options="-i html">
<backend name="javahelp" backend="sgml" fragid="help"  options="-i help">
<backend name="htmlhelp" supported="no">
<style-specification id="print" use="docbook">
<style-specification-body>
.
.
.
In this example, the stylesheet has been annotated with a title, a list of the public IDs to which it is applicable, and a table that provides information about the output formats that it supports.
Using this information, the format command can get all the
information it needs to construct the appropriate call to Jade. To
make HTML from myfile.sgm,
format would run the following:
jade -t sgml -d mybook.dsl#htmlweb -i html myfile.sgm
The additional information, titles and public IDs, can be used as part of a GUI interface to simplify the selection of stylesheets for an author.
The complete annotated stylesheet DTD, and an example of the format command script, are provided on the CD-ROM.
There is a growing list of tools to process DocBook documents using XSL stylesheets. Each tool implements parts or all of the XSL standard, which actually has several components:
A language for expressing stylesheets written in XML. It includes the formatting object language, but refers to separate documents for the transformation language and the path language.
The part of XSL for transforming XML documents into other XML documents, HTML, or text. It can be used to rearrange the content and generate new content.
A language for addressing parts of an XML document. It is used to find the parts of your document to apply different styles to. All XSL processors use this component.
To publish HTML from your XML documents, you just need an XSLT engine. To get to print, you need an XSLT engine to produce formatting objects (FO), which then must be processed with a formatting object processor to produce PostScript or PDF output.
James Clark's XT was the first useful XSLT engine,
and it is still in wide use. It is written in Java, so it
runs on many platforms, and it is free (
http://www.jclark.com).
XT comes with James Clark's nonvalidating parser XP, but
you can substitute a different Java parser. Here is a
simple example of using XT from the Unix command line to
produce HTML: You'll need to alter your
CLASSPATH environment variable to
include the path to where you put the
.jar files from the XT
distribution.
CLASSPATH=xt.jar:xp.jar:sax.jar export CLASSPATH java com.jclark.xsl.sax.Driverfilename.xmldocbook/html/docbook.xsl>output.html
If you replace the HTML stylesheet with a formatting object stylesheet, XT will produce a formatting object file. Then you can convert that to PDF using FOP, a formatting object processor available for free from the Apache XML Project ( http://xml.apache.org). Here is an example of that two stage processing:
CLASSPATH=xt.jar:xp.jar:sax.jar:fop.jar export CLASSPATH java com.jclark.xsl.sax.Driverfilename.xmldocbook/fo/docbook.xsl>output.fojava org.apache.fop.apps.CommandLineoutput.fooutput.pdf
As of this writing, some other XSLT processors to choose from include:
4XSLT, written in Python, from FourThought LLC ( http://www.fourthought.com)
Sablotron, written in C++, from Ginger Alliance ( http://www.gingerall.com)
Saxon, written in Java, from Michael Kay ( http://users.iclway.co.uk/mhkay/saxon)
Xalan, written in Java, from the Apache XML Project ( http://xml.apache.org)
XML::XSLT,written in Perl, from Geert Josten and Egon Willighagen ( http://www.cpan.org)
For print output, these additional tools are available for processing formatting objects:
XEP (written in Java) from RenderX ( http://www.renderx.com).
PassiveTeX from Sebastian Rahtz (http://users.ox.ac.uk/~rahtz/passivetex/).
XSL is both a transformation language and a formatting language. The XSLT transformation part lets you scan through a document's structure and rearrange its content any way you like. You can write out the content using a different set of XML tags, and generate text as needed. For example, you can scan through a document to locate all headings and then insert a generated table of contents at the beginning of the document, at the same time writing out the content marked up as HTML. XSL is also a rich formatting language, letting you apply typesetting controls to all components of your output. With a good formatting backend, it is capable of producing high quality printed pages.
An XSL stylesheet is written using XML syntax, and is
itself a well-formed XML document. That makes the basic
syntax familiar, and enables an XML processor to check for
basic syntax errors. The stylesheet instructions use
special element names, which typically begin with
xsl: to distinguish them from any XML
tags you want to appear in the output. The XSL namespace is
identified at the top of the stylesheet file. As with other
XML, any XSL elements that are not empty will require a
closing tag. And some XSL elements have specific attributes
that control their behavior. It helps to keep a good XSL
reference book handy.
Here is an example of a simple XSL stylesheet applied to a simple XML file to generate HTML output.
Example 4.9. Simple XML file
<?xml version="1.0"?>
<document>
<title>Using a mouse</title>
<para>It's easy to use a mouse. Just roll it
around and click the buttons.</para>
</document>
Example 4.10. Simple XSL stylesheet
<?xml version='1.0'?>
<xsl:stylesheet
          xmlns:xsl="http://www.w3.org/1999/XSL/Transform" version='1.0'>
<xsl:output method="html"/>

<xsl:template match="document">
  <HTML><HEAD><TITLE>
    <xsl:value-of select="./title"/>
  </TITLE>
  </HEAD>
  <BODY>
    <xsl:apply-templates/>
  </BODY>
  </HTML>
</xsl:template>

<xsl:template match="title">
  <H1><xsl:apply-templates/></H1>
</xsl:template>

<xsl:template match="para">
  <P><xsl:apply-templates/></P>
</xsl:template>

</xsl:stylesheet>
Example 4.11. HTML output
<HTML>
<HEAD>
<TITLE>Using a mouse</TITLE>
</HEAD>
<BODY>
<H1>Using a mouse</H1>
<P>It's easy to use a mouse. Just roll it
around and click the buttons.</P>
</BODY>
</HTML>
XSL is a template language, not a procedural language. That means a stylesheet specifies a sample of the output, not a sequence of programming steps to generate it. A stylesheet consists of a mixture of output samples with instructions of what to put in each sample. Each bit of output sample and instructions is called a template.
In general, you write a template for each element type in your document. That lets you concentrate on handling just one element at a time, and keeps a stylesheet modular. The power of XSL comes from processing the templates recursively. That is, each template handles the processing of its own element, and then calls other templates to process its children, and so on. Since an XML document is always a single root element at the top level that contains all of the nested descendent elements, the XSL templates also start at the top and work their way down through the hierarchy of elements.
Take the
DocBook <para> paragraph element as
an example. To convert this to HTML, you want to wrap the
paragraph content with the HTML
tags <p> and <//p>.
But a DocBook <para> can contain
any number of in-line DocBook elements marking up the text.
Fortunately, you can let other templates take care of those
elements, so your XSL template
for <para> can be quite
simple:
<xsl:template match="para">
  <p>
    <xsl:apply-templates/>
  </p>
</xsl:template>
The <xsl:template> element
starts a new template, and
its match attribute indicates where to
apply the template, in this case to
any <para> elements. The template
says to output a literal <p> string
and then execute
the <xsl:apply-templates/> instruction.
This tells the XSL processor to look among all the
templates in the stylesheet for any that should be applied
to the content of the paragraph. If each template in the
stylesheet includes
an <xsl:apply-templates/> instruction,
then all descendents will eventually be processed. When it
is through recursively applying templates to the paragraph
content, it outputs the <//p> closing
tag.
Since you aren't writing a linear procedure to
process your document, the context of where and how to
apply each modular template is important.
The match attribute
of <xsl:template> provides that
context for most templates. There is an entire expression
language, XPath, for identifying what parts of your
document should be handled by each template. The simplest
context is just an element name, as in the example above.
But you can also specify elements as children of other
elements, elements with certain attribute values, the first
or last elements in a sequence, and so on. Here is how the
DocBook <formalpara> element is
handled:
<xsl:template match="formalpara">
  <p>
    <xsl:apply-templates/>
  </p>
</xsl:template>

<xsl:template match="formalpara/title">
  <b><xsl:apply-templates/></b>
  <xsl:text> </xsl:text>
</xsl:template>

<xsl:template match="formalpara/para">
  <xsl:apply-templates/>
</xsl:template>
There are three templates defined, one for
the <formalpara> element itself,
and one for each of its children elements. The match attribute
value formalpara/title in the second
template is an XPath expression indicating
a <title> element that is an
immediate child of
a <formalpara> element. This
distinguishes such titles from
other <title> elements used in
DocBook. XPath expressions are the key to controlling how
your templates are applied.
In general, the XSL processor has internal rules that
apply templates that are more specific before templates
that are less specific. That lets you control the details,
but also provides a fallback mechanism to a less specific
template when you don't supply the full context for every
combination of elements. This feature is illustrated by the
third template, for formalpara/para. By
including this template, the stylesheet processes a <para> within <formalpara> in
a special way, in this case by not outputting the HTML <p> tags already output by its parent. If this template had not been included, then the processor would have fallen back to the template
specified by match="para" described
above, which would have output a second set of <p> tags.
You can also control template context with
XSL modes, which are used extensively
in the DocBook stylesheets. Modes let you process the same
input more than once in different ways.
A mode attribute in
an <xsl:template> definition adds a
specific mode name to that template. When the same mode
name is used
in <xsl:apply-templates/>, it acts
as a filter to narrow the selection of templates to only
those selected by
the match expression and that
have that mode name. This lets you define two different
templates for the same element match that are applied under
different contexts. For example, there are two templates
defined for
DocBook <listitem> elements:
<xsl:template match="listitem">
  <li><xsl:apply-templates/></li>
</xsl:template>

<xsl:template match="listitem" mode="xref">
  <xsl:number format="1"/>
</xsl:template>
The first template is for the normal list item
context where you want to output the
HTML <li> tags. The second template
is called with <xsl:apply-templates
select="$target" mode="xref"/> in the context
of processing <xref> elements. In
this case the select attribute locates
the ID of the specific list item and
the mode attribute selects the second
template, whose effect is to output its item number when it
is in an ordered list. Because there are many such special
needs when
processing <xref> elements, it is
convenient to define a mode name xref to
handle them all. Keep in mind that mode settings
do not automatically get passed down to
other templates
through <xsl:apply-templates/>.
Although XSL is template-driven, it also has some features of traditional programming languages. Here are some examples from the DocBook stylesheets.
Assign a value to a variable:
<xsl:variable name="refelem" select="name($target)"/>

If statement:
<xsl:if test="$show.comments">
    <i><xsl:call-template name="inline.charseq"/></i>
</xsl:if>

Case statement:
<xsl:choose>
    <xsl:when test="@columns">
        <xsl:value-of select="@columns"/>
    </xsl:when>
    <xsl:otherwise>1</xsl:otherwise>
</xsl:choose>

Call a template by name like a subroutine, passing parameter values and accepting a return value:
<xsl:call-template name="xref.xreflabel">
   <xsl:with-param name="target" select="$target"/>
</xsl:call-template>
However, you can't always use these constructs as you do in other programming languages. Variables in particular have very different behavior.
XSL provides two elements that let you assign a value
to a
name: <xsl:variable> and <xsl:param>.
These share the same name space and syntax for assigning
names and values. Both can be referred to using
the $name syntax. The main difference
between these two elements is that a param's value acts as
a default value that can be overridden when a template is
called using
a <xsl:with-param> element as in the
last example above.
Here are two examples from DocBook:
<xsl:param name="cols">1</xsl:param>
<xsl:variable name="segnum" select="position()"/>
In both elements, the name of the parameter or
variable is specified with
the name attribute. So the name of
the param here
is cols and the name of
the variable is segnum.
The value of either can be supplied in two ways. The value
of the first example is the text node "1" and is supplied
as the content of the element. The value of the second
example is supplied as the result of the expression in
its select attribute, and the element
itself has no content.
The feature of XSL variables that is odd to new users is that once you assign a value to a variable, you cannot assign a new value within the same scope. Doing so will generate an error. So variables are not used as dynamic storage bins they way they are in other languages. They hold a fixed value within their scope of application, and then disappear when the scope is exited. This feature is a result of the design of XSL, which is template-driven and not procedural. This means there is no definite order of processing, so you can't rely on the values of changing variables. To use variables in XSL, you need to understand how their scope is defined.
Variables defined outside of all templates are considered global variables, and they are readable within all templates. The value of a global variable is fixed, and its global value can't be altered from within any template. However, a template can create a local variable of the same name and give it a different value. That local value remains in effect only within the scope of the local variable.
Variables defined within a template remain in effect
only within their permitted scope, which is defined as all
following siblings and their descendants. To understand
such a scope, you have to remember that XSL instructions
are true XML elements that are embedded in an XML family
hierarchy of XSL elements, often referred to as parents,
children, siblings, ancestors and descendants. Taking the
family analogy a step further, think of a variable
assignment as a piece of advice that you are allowed to
give to certain family members. You can give your advice
only to your younger siblings (those that follow you) and
their descendents. Your older siblings won't listen,
neither will your parents or any of your ancestors. To
stretch the analogy a bit, it is an error to try to give
different advice under the same name to the same group of
listeners (in other words, to redefine the variable). Keep
in mind that this family is not the elements of your
document, but just the XSL instructions in your stylesheet.
To help you keep track of such scopes in hand-written
stylesheets, it helps to indent nested XSL elements. Here
is an edited snippet from the DocBook stylesheet
file pi.xsl that illustrates different
scopes for two variables:
 1 <xsl:template name="dbhtml-attribute">
 2 ...
 3    <xsl:choose>
 4       <xsl:when test="$count>count($pis)">
 5          <!-- not found -->
 6       </xsl:when>
 7       <xsl:otherwise>
 8          <xsl:variable name="pi">
 9             <xsl:value-of select="$pis[$count]"/>
10          </xsl:variable>
11          <xsl:choose>
12             <xsl:when test="contains($pi,concat($attribute, '='))">
13                <xsl:variable name="rest" select="substring-after($pi,concat($attribute,'='))"/>
14                <xsl:variable name="quote" select="substring($rest,1,1)"/>
15                <xsl:value-of select="substring-before(substring($rest,2),$quote)"/>
16             </xsl:when>
17             <xsl:otherwise>
18             ...
19             </xsl:otherwise>
20          </xsl:choose>
21       </xsl:otherwise>
22    </xsl:choose>
23 </xsl:template>
The scope of the variable pi begins
on line 8 where it is defined in this template, and ends on
line 20 when its last sibling ends.[17] The scope of the
variable rest begins on line 13 and ends
on line 15. Fortunately, line 15 outputs an expression
using the value before it goes out of scope.
What happens when
an <xsl:apply-templates/> element
is used within the scope of a local variable? Do the
templates that are applied to the document children get the
variable? The answer is no. The templates that are applied
are not actually within the scope of the variable. They
exist elsewhere in the stylesheet and are not following
siblings or their descendants.
To pass a value to another template, you pass a
parameter using
the <xsl:with-param> element. This
parameter passing is usually done with calls to a specific
named template
using <xsl:call-template>, although
it works
with <xsl:apply-templates> too.
That's because the called template must be expecting the
parameter by defining it using
a <xsl:param> element with the same
parameter name. Any passed parameters whose names are not
defined in the called template are ignored.
Here is an example of parameter passing
from docbook.xsl:
<xsl:call-template name="head.content">
   <xsl:with-param name="node" select="$doc"/>
</xsl:call-template>
Here a template
named head.content is being called and
passed a parameter named node whose
content is the value of the $doc variable
in the current context. The top of that template looks like
this:
<xsl:template name="head.content">
   <xsl:param name="node" select="."/>
The template is expecting the parameter because it
has a <xsl:param> defined with the
same name. The value in this definition is the default
value. This would be the parameter value used in the
template if the template was called without passing that
parameter.
You generate HTML from your DocBook XML files by
applying the HTML version of the stylesheets. This is done
by using the HTML driver
file docbook/html/docbook.xsl as your
stylesheet. That is the master stylesheet file that
uses <xsl:include> to pull in the
component files it needs to assemble a complete stylesheet
for producing HTML.
The way the DocBook stylesheet generates HTML is to
apply templates that output a mix of text content and HTML
elements. Starting at the top level in the main
file docbook.xsl:
<xsl:template match="/">
  <xsl:variable name="doc" select="*[1]"/>
  <html>
  <head>
    <xsl:call-template name="head.content">
      <xsl:with-param name="node" select="$doc"/>
    </xsl:call-template>
  </head>
  <body>
    <xsl:apply-templates/>
  </body>
  </html>
</xsl:template>
This template matches the root element of your input
document, and starts the process of recursively applying
templates. It first defines a variable
named doc and then outputs two literal
HTML elements <html> and <head>.
Then it calls a named
template head.content to process the
content of the HTML <head>, closes
the <head> and starts
the <body>. There it
uses <<xsl:apply-templates/>/> to
recursively process the entire input document. Then it just
closes out the HTML file.
Simple HTML elements can generated as literal
elements as shown here. But if the HTML being output
depends on the context, you need something more powerful to
select the element name and possibly add attributes and
their values. Here is a fragment
from sections.xsl that shows how a
heading tag is generated using
the <xsl:element> and <xsl:attribute> elements:
 1 <xsl:element name="h{$level}">
 2   <xsl:attribute name="class">title</xsl:attribute>
 3   <xsl:if test="$level<3">
 4     <xsl:attribute name="style">clear: all</xsl:attribute>
 5   </xsl:if>
 6   <a>
 7     <xsl:attribute name="name">
 8       <xsl:call-template name="object.id"/>
 9     </xsl:attribute>
10     <b><xsl:copy-of select="$title"/></b>
11   </a>
12 </xsl:element>
This whole example is generating a single HTML
heading element. Line 1 begins the HTML element definition
by identifying the name of the element. In this case, the
name is an expression that includes the
variable $level passed as a parameter to
this template. Thus a single template can
generate <h1>, <h2>,
etc. depending on the context in which it is called. Line 2
defines a class="title" attribute that is
added to this element. Lines 3 to 5 add
a style="clear all" attribute, but only
if the heading level is less than 3. Line 6 opens
an <a> anchor element. Although this
looks like a literal output string, it is actually modified
by lines 7 to 9 that insert
the name attribute into
the <a> element. This illustrates
that XSL is managing output elements as active element
nodes, not just text strings. Line 10 outputs the text of
the heading title, also passed as a parameter to the
template, enclosed in HTML boldface tags. Line 11 closes
the anchor tag with the
literal <//a> syntax, while line 12
closes the heading tag by closing the element definition.
Since the actual element name is a variable, it couldn't
use the literal syntax.
As you follow the sequence of nested templates
processing elements, you might be wondering how the
ordinary text of your input document gets to the output. In
the file docbook.xsl you will find
this template that handles any text not processed by any
other template:
<xsl:template match="text()">
  <xsl:value-of select="."/>
</xsl:template>
This template's body consists of the "value" of the text node, which is just its text. In general, all XSL processors have some built-in templates to handle any content for which your stylesheet doesn't supply a matching template. This template serves the same function but appears explicitly in the stylesheet.
You generate formatting objects from your DocBook XML
files by applying the fo version of the stylesheets. This
is done by using the fo driver
file docbook/fo/docbook.xsl as your
stylesheet. That is the master stylesheet file that
uses <xsl:include> to pull in the
component files it needs to assemble a complete stylesheet
for producing formatting objects. Generating a formatting
objects file is only half the process of producing typeset
output. You also need a formatting object processor such as
the Apache XML Project's FOP as described in an earlier
section.
The DocBook fo stylesheet works in a similar manner
to the HTML stylesheet. Instead of outputting HTML tags, it
outputs text marked up
with <fo: tags.
For example, to indicate that some text should be kept
in-line and typeset with a monospace font, it might look
like this:something>
<fo:inline-sequence font-family="monospace">/usr/man</fo:inline-sequence>
The templates
in docbook/fo/inline.xsl that produce
this output for a
DocBook <filename> element look
like this:
<xsl:template match="filename">
  <xsl:call-template name="inline.monoseq"/>
</xsl:template>

<xsl:template name="inline.monoseq">
  <xsl:param name="content">
    <xsl:apply-templates/>
  </xsl:param>
  <fo:inline-sequence font-family="monospace">
    <xsl:copy-of select="$content"/>
  </fo:inline-sequence>
</xsl:template>
There are dozens of fo tags and attributes specified in the XSL standard. It is beyond the scope of this document to cover how all of them are used in the DocBook stylesheets. Fortunately, this is only an intermediate format that you probably won't have to deal with very much directly unless you are writing your own stylesheets.
The DocBook XSL stylesheets are written in a modular fashion. Each of the HTML and FO stylesheets starts with a driver file that assembles a collection of component files into a complete stylesheet. This modular design puts similar things together into smaller files that are easier to write and maintain than one big stylesheet. The modular stylesheet files are distributed among four directories:
contains code common to both stylesheets, including localization data
a stylesheet that produces XSL FO result trees
a stylesheet that produces HTML/XHTML result trees
contains schema-independent functions
The driver files for each of HTML and FO stylesheets
are html/docbook.xsl and fo/docbook.xsl,
respectively. A driver file consists mostly of a bunch
of <xsl:include> instructions to
pull in the component templates, and then defines some
top-level templates. For example:
<xsl:include href="../VERSION"/>
<xsl:include href="../lib/lib.xsl"/>
<xsl:include href="../common/l10n.xsl"/>
<xsl:include href="../common/common.xsl"/>
<xsl:include href="autotoc.xsl"/>
<xsl:include href="lists.xsl"/>
<xsl:include href="callout.xsl"/>
...
<xsl:include href="param.xsl"/>
<xsl:include href="pi.xsl"/>
The first four modules are shared with the FO
stylesheet and are referenced using relative pathnames to
the common directories. Then the long list of component
stylesheets starts. Pathnames in include statements are
always taken to be relative to the including file. Each
included file must be a valid XSL stylesheet, which means
its root element must
be <xsl:stylesheet>.
XSL actually provides two inclusion
mechanisms: <xsl:include> and <xsl:import>.
Of the two, <xsl:include> is
the simpler. It treats the included content as if it were
actually typed into the file at that point, and doesn't
give it any more or less precedence relative to the
surrounding text. It is best used when assembling
dissimilar templates that don't overlap what they match.
The DocBook driver files use this instruction to assemble a
set of modules into a stylesheet.
In contrast, <xsl:import> lets
you manage the precedence of templates and variables. It is
the preferred mode of customizing another stylesheet because
it lets you override definitions in the distributed
stylesheet with your own, without altering the distribution
files at all. You simply import the whole stylesheet and
add whatever changes you want.
The precedence rules for import are detailed and rigorously defined in the XSL standard. The basic rule is that any templates and variables in the importing stylesheet have precedence over equivalent templates and variables in the imported stylesheet. Think of the imported stylesheet elements as a fallback collection, to be used only if a match is not found in the current stylesheet. You can customize the templates you want to change in your stylesheet file, and let the imported stylesheet handle the rest.
Customizing a DocBook XSL stylesheet is the opposite of customizing a DocBook DTD. When you customize a DocBook DTD, the rules of XML and SGML dictate that the first of any duplicate declarations wins. Any subsequent declarations of the same element or entity are ignored. The architecture of the DTD provides slots for inserting your own custom declarations early enough in the DTD for them to override the standard declarations. In contrast, customizing an XSL stylesheet is simpler because your definitions have precedence over imported ones.
You can carry modularization to deeper levels because module files can also include or import other modules. You'll need to be careful to maintain the precedence that you want as the modules get rolled up into a complete stylesheet.
There is currently one example of customizing
with <xsl:import> in the HTML
version of the DocBook stylesheets.
The xtchunk.xsl stylesheet modifies the
HTML processing to output many smaller HTML files rather
than a single large file per input document. It uses XSL
extensions defined only in the XSL
processor XT. In the driver
file xtchunk.xsl, the first instruction
is <xsl:import
href="docbook.xsl"/>. That instruction imports
the original driver file, which in turn uses
many <xsl:include> instructions to
include all the modules. That single import instruction
gives the new stylesheet the complete set of DocBook
templates to start with.
After the
import, xtchunk.xsl redefines some of
the templates and adds some new ones. Here is one example
of a redefined template:
Original template in autotoc.xsl <xsl:template name="href.target"> <xsl:param name="object" select="."/> <xsl:text>#</xsl:text> <xsl:call-template name="object.id"> <xsl:with-param name="object" select="$object"/> </xsl:call-template> </xsl:template> New template in xtchunk.xsl <xsl:template name="href.target"> <xsl:param name="object" select="."/> <xsl:variable name="ischunk"> <xsl:call-template name="chunk"> <xsl:with-param name="node" select="$object"/> </xsl:call-template> </xsl:variable> <xsl:apply-templates mode="chunk-filename" select="$object"/> <xsl:if test="$ischunk='0'"> <xsl:text>#</xsl:text> <xsl:call-template name="object.id"> <xsl:with-param name="object" select="$object"/> </xsl:call-template> </xsl:if> </xsl:template>
The new template handles the more complex processing
of HREFs when the output is split into many HTML files.
Where the old template could simply
output #,
the new one outputs object.idfilename#object.id
You may not have to define any new templates,
however. The DocBook stylesheets are parameterized using
XSL variables rather than hard-coded values for many of the
formatting features. Since
the <xsl:import> mechanism also
lets you redefine global variables, this gives you an easy
way to customize many features of the DocBook
stylesheets. Over time, more features will be parameterized to permit customization. If you find hardcoded values in the stylesheets that would be useful to customize, please let the maintainer know.
Near the end of the list of includes in the main
DocBook driver file is the
instruction <xsl:include
href="param.xsl"/>.
The param.xsl file is the most
important module for customizing a DocBook XSL stylesheet.
This module contains no templates, only definitions of
stylesheet variables. Since these variables are defined
outside of any template, they are global variables and
apply to the entire stylesheet. By redefining these
variables in an importing stylesheet, you can change the
behavior of the stylesheet.
To create a customized DocBook stylesheet, you simply
create a new stylesheet file such
as mystyle.xsl that imports the standard
stylesheet and adds your own new variable definitions. Here
is an example of a complete custom stylesheet that changes
the depth of sections listed in the table of contents from
two to three:
<?xml version='1.0'?>
<xsl:stylesheet xmlns:xsl="http://www.w3.org/1999/XSL/Transform"
version='1.0'
xmlns="http://www.w3.org/TR/xhtml1/transitional"
exclude-result-prefixes="#default">
<xsl:import
href="docbook.xsl"/>
<xsl:variable name="toc.section.depth">3</xsl:variable>
<!-- Add other variable definitions here -->
</xsl:stylesheet>
Following the opening stylesheet element are the
import instruction and one variable definition. The
variable toc.section.depth was defined
in param.xsl with value "2", and here
it is defined as "3". Since the importing stylesheet takes
precedence, this new value is used. Thus documents
processed with mystyle.xsl instead
of docbook.xsl will have three levels
of sections in the tables of contents, and all other
processing will be the same.
Use the list of variables
in param.xsl as your guide for creating
a custom stylesheet. If the changes you want are controlled
by a variable there, then customizing is easy.
If the changes you want are more extensive than what
is supported by variables, you can write new templates. You
can put your new templates directly in your importing
stylesheet, or you can modularize your importing stylesheet
as well. You can write your own stylesheet module
containing a collection of templates for processing lists,
for example, and put them in a file
named mylists.xsl. Then your importing
stylesheet can pull in your list templates with
a <xsl:include
href="mylists.xsl"/> instruction. Since your
included template definitions appear after the main import
instruction, your templates will take precedence.
You'll need to make sure your new templates are compatible with the remaining modules, which means:
Any named templates should use the same name so calling templates in other modules can find them.
Your template set should process the same elements matched by templates in the original module, to ensure complete coverage.
Include the same set
of <xsl:param> elements in each
template to interface properly with any calling templates,
although you can set different values for your
parameters.
Any templates that are used like subroutines to return a value should return the same data type.
Another approach to customizing the stylesheets is to
write your own driver file. Instead of
using <xsl:import
href="docbook.xsl"/>, you copy that file to a
new name and rewrite any of
the <xsl:include/> instructions to
assemble a custom collection of stylesheet modules. One
reason to do this is to speed up processing by reducing the
size of the stylesheet. If you are using a customized
DocBook DTD that omits many elements you never use, you
might be able to omit those modules of the
stylesheet.
The DocBook stylesheets include features for
localizing generated text, that is, printing any generated
text in a language other than the default English. In
general, the stylesheets will switch to the language
identified by a lang attribute when
processing elements in your documents. If your documents
use the lang attribute, then you don't
need to customize the stylesheets at all for
localization.
As far as the stylesheets go,
a lang attribute is inherited by the
descendents of a document element. The stylesheet searches
for a lang attribute using this XPath
expression:
<xsl:variable name="lang-attr"
         select="($target/ancestor-or-self::*/@lang
                  |$target/ancestor-or-self::*/@xml:lang)[last()]"/>
This locates the attribute on the current element or
its most recent ancestor. Thus
a lang attribute is in effect for an
element and all of its descendents, unless it is reset in
one of those descendents. If you define it in only your
document root element, then it applies to the whole
document:
<?xml version="1.0"?>
<!DOCTYPE book PUBLIC "-//OASIS//DTD DocBook XML V4.0//EN" "docbook.dtd">
<book lang="fr">
...
</book>
When text is being generated, the stylesheet checks
the most recent lang attribute and looks
up the generated text strings for that language in a
localization XML file. These are located in
the common directory of the
stylesheets, one file per language. Here is the top of the
file fr.xml:
<localization language="fr"> <gentext key="abstract" text="Résumé"/> <gentext key="answer" text="R:"/> <gentext key="appendix" text="Annexe"/> <gentext key="article" text="Article"/> <gentext key="bibliography" text="Bibliographie"/> ...
The stylesheet templates use the gentext key names,
and then the stylesheet looks up the associated text value
when the document is processed with that lang setting. The
file l10n.xml (note
the .xml suffix) lists the filenames of
all the supported languages.
You can also create a custom stylesheet that sets the
language. That might be useful if your documents don't make
appropriate use of the lang attribute.
The module l10n.xsl defines two global
variables that can be overridden with an importing
stylesheet as described above. Here are their default
definitions:
<xsl:variable name="l10n.gentext.language"></xsl:variable>
<xsl:variable name="l10n.gentext.default.language">en</xsl:variable>
The first one sets the language for all elements,
regardless of an element's lang attribute
value. The second just sets a default language for any
elements that haven't got a lang setting
of their own (or their ancestors).
[14] See Formally Published CALS Standards for more information.
[15] Language codes should conform to IETF RFC 3066.
[16] The use of uppercase names here is intentional. These are not attributes that an author is ever expected to type. In XML, which is case-sensitive, using uppercase for things like this reduces the likelihood of collision with “real” attribute names in the DTD.
[17] Technically, the scope extends to the end tag of the parent of the <xsl:variable> element. That is effectively the last sibling.
| | | |
| Parsing DocBook Documents | | Customizing DocBook |